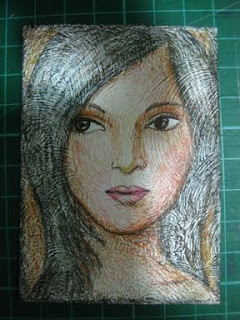
When I started making ATCs, my sister lent me a tub of gesso and I used it to coat some cards. When it ran out, she told me that she found out that the inexpensive wall putty available in construction supply or hardware stores can give you the same texture at a much lower cost. I am all for lower costs! In fact, when I was looking for materials to make my ATCs, I found a pile of my wedding invitations (the printer printed too many), so now, many of my cards are drawn on these.
1. Gesso or Wall Putty
Brush on some gesso or the more inexpensive wall putty onto the card. You can use whatever stroke you want to get the texture you want. Since I will be making a portrait, I don't want to have too rough a texture. So, I just brushed on a thin layer with circular strokes. If I were just making a background for a collage or a landscape maybe, I can use a thicker layer to give a rougher look. I really think the texture that the gesso/ wall putty gives adds a lot to the finished card. That's why I use this technique a lot. Wait for the putty to dry and then...2. Measure to size
Since I am recycling my extra wedding invitations, I measure out 4 cards at 2.5 by 3.5 inches, which is the standard ATC size. You can use any medium to make an ATC but, they must be that particular standard size.3. Cut to size
I use a steel ruler and a cutter to cut my cards. I find it easier to get a straight cut with the blade rather than a pair of scissors.4. Pencil Sketch
This is the tricky part if you aren't confident in your drawing skills. I have been drawing women since I was a young girl (I made a lot of paperdolls!) so I can either make a pencil sketch freehand from my imagination or have a magazine photo as a guide.
Another option would be to trace a magazine photo (choose one with sharp contrasts) and rub a soft pencil on the back of your tracing. Put the pencil side of your tracing on the card and trace over with a ballpen to leave the pencil markings on the card. Hmmm, I wonder if those instructions were clear enough. (Edit: Tutorial about drawing a face using the tracing technique here.)
5. Final Pen Sketch
Trace over your sketch with your final pen (use a waterproof pen if you will be using watercolor). Sometimes, I use a well sharpened dark brown colored pencil and skip the pen outline. For this portrait, I used a black ballpen which I find is more "forgiving" if I make a line I don't like, since it is so fine.
6. Erase the Pencil lines
I use a kneaded eraser to clean up the sketch and erase any pencil lines that are too noticeable.
7. Colored Pencils
The next step is to color in the sketch with colored pencils. So far, all the materials I've used are very inexpensive and although you can use inexpensive colored pencils, mine are Berol Prismacolor pencils. They are expensive if you buy them in the regular stores, but this year, I was able to get a bargain on eBay for a new set.
I start out with the lightest flesh colors and if I'm making the portrait from my imagination (just like this card), I imagine where the light is coming from so that there will be a darker side and a lighter side. The darker the shade, the more the texture of the gesso or wall putty shows.
8. Darken the EdgesI like to darken the edges of the card to frame the card and I also sometimes finish it off with running a stamp pad along the edge. If I'm not satisfied with the card yet, I can also add a bit of watercolor or watercolor pencils.
9. Watercolor pencil / Watercolor
For this card, I used a dark brown watercolor pencil on the hair. I brushed a little water on those parts I wanted to darken. The order of the steps are not that important. I just keep layering on the colors until I'm happy with the card. Sometimes I start with a light wash of watercolor and build up the color with pencils. Sometimes the watercolor goes on last.
Here is the card, almost finished, with the colored pencils I used on it. I used a variety of colors in shades of flesh, browns, orange to give depth and volume (so that it will look like more than a coloring book image).
10. FinishI like to spray a fixative on the finished card. It think it gives a nice sheen and makes it look more professional (at least to me).
11. Information on the Back
Artist trading cards should have the artist's information on the back of the card. I usually glue a blank card back (hides the wedding invitation and any mess on the back of the card) with my username in ATCs for All, my email address, city and country, blog address and I fill in the blanks with the title of the card, my signature, and the date the card was made. If the card needs flattening, put it under some heavy books.
13. Plastic SleevePut your finished ATC in a plastic sleeve to protect it (make sure it is all dry). Scan it, post it in the ATCs for All gallery and it's all set to be traded!
If you found this helpful and if you would like to have the chance to receive this ATC, please post me a comment.
Congratulations to NancyJB for winning this card!


.jpg)


.jpg)


42 blog hugs:
Peggy,
I am getting my daughter started on ATC's.
She likes to sketch small items - so this size is good to record her work.
HI Peggy i posted at ATC's this is a great tutorial!!!!!!!!!!! I can't wait to try it
ANg
altermyworld(dot)angw(at)gmail(dot)com
I have traded with you for your cards Peggy, and they're are sooo beautiful. I'm so glad you explained the technique. I'd love to give it a try.
fabulous tutorial and beautiful card!! :)
I'm Tlouey at AFA, btw.
Nice tutorial Peggy. I'm definitely trying this technique. Thanks so much for sharing!
Genxster
Wonderful tutorial- I will have to find some of that putty stuff to try! Boatbird at AFA!
way cool!
Saw this over at AFA...wonderful. I just love the texture that the gesso/putty give the piece.
Thanks for posting your steps. I may have to give this a try!
Wow! I love it! Who would have thought to use putty, thanks for the tutorial! Congrats on 100 posts!
Wow - I have always wondered how you made your cards, since they are so beautiful! Thank you for the tutorial. I found it very helpful, especially with so many pictures to really illustrate each step. Congratulations on 100 successful trades and I would love to be entered to win this gorgeous ATC :)
Thank you for the giveaway =D
hurdler4eva(at)gmail(dot)com
Well, I have to start at the beginning since I've never even used gesso or putty. But thanks for sharing, your portraits are lovely.
this is so so helpful. thanks for the instructional. hope you can do more... next step is to learn how to draw a face that's actually facing me (i think i can draw the back of the head better because then there'll be no eyes, nose and mouth to deal with). i wish i could draw like you.
textured and pretty...thanks for the tutorial.
Hello Peggy have followed your link from AFA and I am soooo thrilled that I did.
Your work and detail on your ATC's is amazing.
I am always in awe of artist who can draw 'cos I can't...lol.
But maybe I will give the tracing hint a try, thanks for a fab tutorial.
Thank you for making me welcome on ATA.
Take care and best wishes for 2010.
Chriss x
Thanks for posting this tutorial. I love the cards you paint. They are so beautiful. Now I am truly motivated to try my hand in the coming year.
Wishing you a beautiful Christmas and very blessed New Year.
Thanks a bunch for the tutorial! Your cards are always so lovely!
Sunswirlgirl on AFA
That is a cool technique. Thank you for sharing, I'm going to try it tomorrow.
God Bless,
Karen
Fantastic result and to see the process is just real special
I love your art! WOW! Very beautiful! ♥
This is a wonderful tutorial! Thanks for sharing!
Seriously...I love it! Great step by step instructions! Lovey
I have just linked here from the Magic Carpet Ride, thanks so much for a great tutorial, it is much appreciated.
What a beautiful artist you art!! You are very talented...this is gorgeous.
I would love to see more of your artwork so have joined your followers list. I extend an invitation to you to join me on my followers list as well. Be well. Hugs, Gayle (from Canada
Absolutely gorgeous and you are very nice to share your technique! It's a really great tutorial and I love your artwork.
x
Marina
excellent work I love all the shading and thanks for the mini tutorial
This is so interesting and helpful as I am just learning about ATC. Thank you!
Hey peggy, thank you so much for this tutorial. i am going to follow your instructions and your blog. xJ
Peggy your art work is amazing, your girls are so beautiful, I love how you shared how you created these ATCs xxx
Excellent work Peggy.Me and my son Roby are interested in different techniques of paintings.Thank you for this tutorial.
God Bless you dear.
Beena
India
thanks for the awesome tutorial!
misaacmom at gmail dot com
#752 OWOH ticket holder
Unites States
Great tutorial Peggy.This is really a simple procedure with awesome results. Thanks.
Thank you for sharing the steps you take to make this beautiful art! It is really fun and helpful to see!
I just ventured over here through your OWOH post and am so glad I did - what a wonderful tutorial! I can't wait to try this! I'm intrigued to try applying the gesso thicker and though I'm certainly not an artist as far as drawing faces...at least attempting my hand at it! (Great idea tracing magazines)
Thank you so much - lovely work!
Thank you so much for this tutorial. I didn't know what ATC stood for until now. I love this idea of using wall putty instead of the more expensive gesso. What an awesome tip... and the idea of tracing bodies or faces from a magazine so you can learn the shapes is such a great idea too. I'm really enjoying your blog.
Lee Ann
Great tutorial, Peggy! :) And thanks for visiting my bloggie! There will be a part 2 and a part 3 about my show..... Pictures are ready but I miss time... You know.. hehehhe....:)
OH! I REALLY want to trade something for one of your Madonnas one day! They are so beautiful and happy!
Hello Peggy! I wanted to thank you for visiting my blog. I've fallen in love with your blog; this tutorial is wonderful! I'm looking forward to beginning an art class. It will be a fun creative change from all of the computer course I usually have to take for work. Your drawings are so professional looking, just beautiful!
Shari
nicely explained in your step by step tutorial. I'd love to try this technique. Thanks for sharing.
This is really beautiful thanks so much for sharing your technique I always wanted to do more with coloured pencils. Niki x
thanks so much for showing in such great detail how you achieved this wonderful effect with the gesso/wall putty. I've used wall putty to add lumps and bumps of texture on large canvas paintings before but never thought to do it like you did - it's almost like a fingerprint showing through your portrait. Love it!
Peggy!! This tutorial is amazing! Your talent shines!
nice tutorial
Post a Comment