Google+ peggy aplSEEDS: Tutorial
Showing posts with label Tutorial. Show all posts

Wednesday, August 8, 2012

What's On Your Workdesk Wednesday: Image Transfers

We've been having non-stop heavy rains, rains, rains here in the Philippines, with rivers overflowing and flooding all over!  Fortunately, we live in a high place but so many of our friends have had to evacuate their homes.  We are praying for the rains to stop.


With no work because of the rains, I have had time to have a tidy up and work on my giveaway girls.  I  am planning to add some text, so I cut up some text (reversed and printed using a copier).


I'm going to use the direct image transfer method described in this video....


I received some wonderful ATCs from NydiaBJ and Kate, who asked to trade with me (for my Filipina in Terno series).  I haven't received addresses from some of you so I guess I have to resend my emails.


Check out other desks and join in the fun of WOYWW

Friday, August 6, 2010

How to Alter Clothes 2: Sewing

In this post, I shared about how I made my pattern (by tracing an old blouse) which I use to alter clothes.  Now I will show you my way of altering clothes (from a big size to my size).

So, let's say I have a blouse I want to alter to fit me, like this one.  Hmmm, seems I did not pick a good one to work on since it is white and my bed quilt is also white.  Sorry about that.


So this blouse is BIG (large size Mossimo brand), but I liked the neckline details and it cost only, would you believe, the equivalent of 25 cents.

1.  I start out by turning it inside out and folding it down the center, pinning the sides to make sure it doesn't move.

2.  I lay it out and put the cardboard pattern on top of it, tracing out the pattern with tailors chalk or something else that will wash out.

3.  If you want to check out your pattern before you cut the cloth, you can pin the sides and try out the pinned blouse.  Careful you don't get pricked!

4.  If you are confident about your pattern, just cut out the extra cloth, leaving an allowance of approximately 1.5 cm (5/8 inch).  I used to leave a bigger allowance, when I was afraid of making my blouse too tight, but I always ended up with a loose blouse.  So, if you are confident about your pattern, you can just leave the 1.5 cm.


5.  Lay the sleeve pattern on the cutout sleeves (pinned together), mark and cut out both the sleeves as well.

6.  I start to prepare to sew the sleeve to bodice seam (this is not the expert way, I know, but I think it is the much easier way).  First, I position the cloth pieces so that I won't get confused about which side to sew.


7.  Then, I turn the sleeve piece to make right sides face each other.


8.  I start pinning the sleeve at the middle fold of the sleeve, making it meet the top seam of the blouse, and continue pinning down both sides.


9.  After pinning, you are ready to sew the pieces together.  Remember, and sew 1.5 cm away from the edge of the cloth (on the wrong side).  Actually this can be the most challenging part because it requires sewing curved seams but I do it very slowly.  Those lines on the sewing machine will help you sew the seams evenly.


10.  With the sleeves sewn on, do a zigzag stitch around to keep the cloth from unraveling.

11.  So sorry, but by this time, I forgot to take pictures (too excited to finish the blouse).  But with the blouse turned inside out, pin the sides, sew the side seams, and again do the zigzag stitch.

12.  Then I do the hem of the sleeve (usually, I cut long sleeves to short sleeves).  And viola!  The blouse is finished and I dumped it into the laundry bin and forgot to take a picture!

So there, if you ever buy a 25 cent blouse in the wrong size, you can try altering it.  If it doesn't turn out well, who cares, maybe the next try will be better.  If it turns out well but there are a few crooked seams, I assure you, twinkling eyes and a lovely smile will easily camouflage the crookedest of seams.  Next tutorial... how to have twinkling eyes and a lovely smile.  Just kidding, I'm sure you all know how to do that!

Monday, August 2, 2010

How to Alter Clothes, Making the Pattern: Advice from an Expert?

The Coveted Wolf Dress Form

Ok, I confess, that's not the right title for this post.  It should be "Advice from someone who has no idea what advice an expert would give."  Well, you didn't really think I was an expert on altering clothes did you?

I was delighted with all the comments I got from my "What's on Your Workdesk Wednesday" visitors.  But, oh no, I may have misled you to believe that I actually know HOW to alter clothes!  Well, if you need advice from an expert, you won't find it here.  Maybe this site can help you!  It sort of puts down what I TRY to do.

If any of you are expert seamstresses, I suggest you stop reading my post.  You may faint while reading about my method or say, I can't believe she is actually sharing her absurd way of altering clothes, the nerve!  Actually, I can't believe it myself.  Hmmm, I never know what I will post about next!  Well, here goes, I did warn you...

This is the way I made a pattern...
1.  Some time ago, I had a blouse that I really liked.  I especially liked how it fit me.  Well it got so faded that it was ready to be thrown out/cut up into projects/made into rags.  But, since it fit me so well, I decided to try to make a pattern.

2.  I took it apart at the seams (using a seam ripper).

3.  I folded the bodice part lengthwise and laid it out flat on a piece of cardboard/chipboard.  Since the blouse is symmetrical, I only need a half pattern.  Experts will say that the front and back of a blouse are not the same and the armhole is different in the front and the back.  So true.  But of course, I must say that I prefer loose fitting blouses (very useful for camouflaging bulges) and so, my pattern does not need any tucks and does not need to be so exact.  My inexpert method just won't work for form fitting blouses.

4.  I traced the shape of the folded bodice part, minus the seam allowances. 

5.  I folded the sleeve piece lengthwise and laid it out on a piece of cardboard/chipboard.  Again experts will say that the sleeve is not exactly symmetrical, with the back curve different from the front.  So true.  But as I said, if you aren't making a form fitting blouse, it hardly matters.  Besides, if the blouse you want to alter is so big that you couldn't wear it unless you fixed it, you might as well fix it the inexpert way if that's the only way you can, at least that's what I think.

6.  I traced the shape of the sleeve, minus the seam allowances.

5.  I cut out both traced shapes (bodice and sleeve) and viola!  These two pieces of cardboard are the patterns I use to alter my blouses.  Easy peasy!


Next time I will start the sewing...


Tuesday, July 27, 2010

He who plants a tree, plants a hope.

He who plants a tree
Plants a hope.
Lucy Larcom
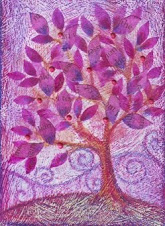
Hello to my wonderful blog friends!  I thought I would share with you a collage I finished the other day.  I made it by first coating a board with wall putty and when the putty was dry, I painted it with watercolor for the trunk, the grass and the background.  I like using a variety of shades when I do this.  Then I used colored pencils (also in various shades) to outline the tree trunk and grass, and to put swirls in the background.  I love how the colored pencils bring out the texture of the wall putty.

Then I got some book paper and colored a few pages in various shades of green, purple, aqua, fuschia, yellow orange and blue.  When the book paper was dry, I cut out the leaf and fruit shapes, trying to find nice words on the page.  Some of the leaves and fruits have words like love, time, truth, God, heart, teach, prayers.  After pasting all the leaves and fruits, I decided I wanted to put in some birds (oh, you know how fond I am of birds if you've visited before).  After painting the birds, I pasted them on as well.  I plan to use this image for some of the products we make for our shop, Papemelroti.  I will add some quotations to the background (digitally) for some of the products.  Hope you like it!

That little bird has chosen his shelter.  
Above it are the stars and the deep heaven of worlds.  
Yet he is rocking himself to sleep without caring for tomorrow's lodging, 
calmly clinging to his little twig, and leaving God to think for him.
-   Martin Luther

Saturday, February 27, 2010

Drawing a Face: Tracing Technique

When I made a tutorial about making an ATC portrait in this post, I realized that the part about making a pencil sketch could be difficult for some.  So, I decided to make a tutorial about tracing a face as a guide for your portrait. You can use this technique for ATCs as well as for bigger pieces.

Tracing is something I used to do as a young girl making paperdolls.  At first, I didn't know how to draw the whole body so I would just trace some drawing or photo of a woman and use the tracing to make a paperdoll.  Eventually, I was able to draw my paperdolls without tracing.  Perhaps, if you try this technique of tracing and studying the proportions of the pictures you trace, you will later be able to draw faces without tracing.

1.  First, you need to find picture that is the right size, something that will fit the size of your ATC (or whatever other size of artwork you are making).  It should be a picture with strong contrasts so that it will be easy to trace.  There are a lot of pictures available in magazines and even in the newspaper.  Here is a picture I found in a newspaper...


2.  Trace the main lines of the newspaper photo with a soft, not so sharp pencil.  You don't have to be so accurate since we're only using the picture to help us draw a face.  We're not actually trying to draw the face itself. 


(Sorry for the bad photos, so full of shadows!  I was making this in bad lighting conditions. Oh well, better bad pictures than none, right?)

3.  After tracing the newspaper photo, flip the tracing paper over such that the side which has the pencil lead touches the card you are making your portrait on.   Position your tracing on the card and perhaps you can tape it to the card so that it won't move while you're transferring the lines.  

4.  Trace heavily over the pencil lines with a pen or pencil so that the pencil lead marks the card under it. I'm using a card that I've coated with wall putty, as I described in this post.  


The picture below shows how the card should look after you trace over the pencil marks.  Notice the faint pencil lead markings that you have made on the card, a mirror image of the picture you traced.


5.  Now you can trace over the pencil marks with a pen or even just a ballpen. You can make changes in the final pen lines and you can add details like eyelashes and eyebrow hairs.

6.  Erase the extra pencil lines with a kneaded eraser.

7.  Looking at the photo you are using to help you draw a face, use watercolor to add volume.  Notice the dark areas in the picture.  Remember your ATC is a mirror image so your shadows should be on the opposite side.  Don't worry about uneven watercolor shades.  We're not making a photo realistic painting (People may not believe it's a painting if it looks too much like a photograph just like this artist's work).

7. Add colored pencils in various shades (just as described in this post.)


The finished card...
 
You can also try out this technique with photos of family and friends which you print out to the right size.

I hope this was helpful.  Let me know if you try this out.  I would love to hear from you!  
(Linking this up with Tutorial Tuesday)

Sunday, November 22, 2009

Artist Trading Card: Portrait Step by Step

I have been making a lot of ATC portraits using variations of the technique I will describe in this post.  I thought it would be good to share it step by step in case anyone wants to try it out. My pictures aren't great because I took them at night and so there's a shadow but if I were to wait for perfect lighting, I'd never be able to get it done so I decided to just go ahead.
When I started making ATCs, my sister lent me a tub of gesso and I used it to coat some cards.  When it ran out, she told me that she found out that the inexpensive wall putty available in construction supply or hardware stores can give you the same texture at a much lower cost.  I am all for lower costs!  In fact, when I was looking for materials to make my ATCs, I found a pile of my wedding invitations (the printer printed too many), so now, many of my cards are drawn on these.

1. Gesso or Wall Putty
Brush on some gesso or the more inexpensive wall putty onto the card.  You can use whatever stroke you want to get the texture you want.  Since I will be making a portrait, I don't want to have too rough a texture.  So, I just brushed on a thin layer with circular strokes.  If I were just making a background for a collage or a landscape maybe, I can use a thicker layer to give a rougher look.  I really think the texture that the gesso/ wall putty gives adds a lot to the finished card.  That's why I use this technique a lot.  Wait for the putty to dry and then...
2. Measure to size
Since I am recycling my extra wedding invitations, I measure out 4 cards at 2.5 by 3.5 inches, which is the standard ATC size.  You can use any medium to make an ATC but, they must be that particular standard size.
3. Cut to size
I use a steel ruler and a cutter to cut my cards.  I find it easier to get a straight cut with the blade rather than a pair of scissors.
4. Pencil Sketch 
This is the tricky part if you aren't confident in your drawing skills.  I have been drawing women since I was a young girl (I made a lot of paperdolls!) so I can either make a pencil sketch freehand from my imagination or have a magazine photo as a guide.
Another option would be to trace a magazine photo (choose one with sharp contrasts) and rub a soft pencil on the back of your tracing.  Put the pencil side of your tracing on the card and trace over with a ballpen to leave the pencil markings on the card.  Hmmm, I wonder if those instructions were clear enough. (Edit: Tutorial about drawing a face using the tracing technique here.)

5. Final Pen Sketch
Trace over your sketch with your final pen (use a waterproof pen if you will be using watercolor).  Sometimes, I use a well sharpened dark brown colored pencil and skip the pen outline.  For this portrait, I used a black ballpen which I find is more "forgiving" if I make a line I don't like, since it is so fine.
6. Erase the Pencil lines
I use a kneaded eraser to clean up the sketch and erase any pencil lines that are too noticeable.


7. Colored Pencils
The next step is to color in the sketch with colored pencils. So far, all the materials I've used are very inexpensive and although you can use inexpensive colored pencils, mine are Berol Prismacolor pencils. They are expensive if you buy them in the regular stores, but this year, I was able to get a bargain on eBay for a new set.

I start out with the lightest flesh colors and if I'm making the portrait from my imagination (just like this card), I imagine where the light is coming from so that there will be a darker side and a lighter side. The darker the shade, the more the texture of the gesso or wall putty shows.


8. Darken the Edges
I like to darken the edges of the card to frame the card and I also sometimes finish it off with running a stamp pad along the edge. If I'm not satisfied with the card yet, I can also add a bit of watercolor or watercolor pencils.


9. Watercolor pencil / Watercolor
For this card, I used a dark brown watercolor pencil on the hair.  I brushed a little water on those parts I wanted to darken. The order of the steps are not that important. I just keep layering on the colors until I'm happy with the card. Sometimes I start with a light wash of watercolor and build up the color with pencils. Sometimes the watercolor goes on last.


Here is the card, almost finished, with the colored pencils I used on it. I used a variety of colors in shades of flesh, browns, orange to give depth and volume (so that it will look like more than a coloring book image).
 
10. Finish
I like to spray a fixative on the finished card.  It think it gives a nice sheen and makes it look more professional (at least to me).


11. Information on the Back
Artist trading cards should have the artist's information on the back of the card.  I usually glue a blank card back (hides the wedding invitation and any mess on the back of the card) with my username in ATCs for All, my email address, city and country, blog address and I fill in the blanks with the title of the card, my signature, and the date the card was made. If the card needs flattening, put it under some heavy books.

13. Plastic Sleeve
Put your finished ATC in a plastic sleeve to protect it (make sure it is all dry).    Scan it, post it in the ATCs for All gallery and it's all set to be traded! 

If you found this helpful and if you would like to have the chance to receive this ATC, please post me a comment. 

Congratulations to NancyJB for winning this card!


Related Posts with Thumbnails